Friday, October 7, 2022

Apple Crisp

APPLE CRISP

Filling:

5-6 apples of your choice (I dont peel), cut into approx 1 inch pieces

1/3 cup sugar

1tsp cinnamon

Place apples in baking dish, add sugar and cinnamon. Give it a bit of a stir to sugar coat apples.

Crumble topping:

2/3 cup flour

2/3 cup rolled oats

2/3 cup brown sugar

2/3 cup melted butter

Combine the above in a bowl and stir just until mixed. Sprinkle over apples.

At 350 degrees, bake for about 30 min. If you choose a softer apple like mcintosh, cook 5 min less. Harder apples like granny smith add 5 min.

Let cool and serve with ice cream. Enjoy!

Baked Tortellini with bonus Crockpot Version

BAKED VERSION

Ingredients:

1 lb ground cooked ground beef (I season with 1 tbsp steak spice)

1 large can diced tomatoes

1 large jar pasta sauce, your choice of flavour

2 cans sliced mushrooms, only drain 1

1 tbsp Italian seasoning

2 pkgs fresh tortellini

2 cups shredded mozza

In a bowl mix cooked beef, diced tomatoes, tomato sauce, mushrooms (only drain 1) and Italian seasoning.

In a 9x13in baking dish - put two ladles of sauce mix in bottom. Add and spread out the tortellini, top with remainder of sauce and then top with cheese. I sprinkle some parsley on top - thats up to you.

At 350 degrees, bake covered with foil for 30 min and 10-15 uncovered until cheese bubbles. Let rest for 5 min or so and enjoy!


CROCKPOT VERSION

Ingredients:

1 lb ground cooked ground beef (I season with 1 tbsp steak spice)

1 large can diced tomatoes

1 large jar pasta sauce, your choice of flavour

2 cans sliced mushrooms, do not drain

1 cup beef broth

1 tbsp Italian seasoning

2 pkgs fresh tortellini

parmesan or shredded mozza cheese

In crock put all ingredients except tortellini and cheese. Cook on low for 4 hours, add tortellini and cook for 30-40 min more. Sprinkle with parm or mozza when serving.

Friday, September 25, 2020

Crochet Chunky Pumpkins - Free Pattern


Fall is definitely in the air, add some fun chunky pumpkins to your décor!

Supplies:

Your choice of bulky weight yarn (5)

Size N (9) crochet hook

Darning needle

Poly fill


Large Pumpkin Pattern:

Chain 26 (be sure to leave a 12 inch tail for cinching), in second chain from hook SC in each stitch (25sc), chain 1 loosely, turn.

SC in BLO for next 24 stitches, SC in BOTH loops of the chain 1 from previous row (this allows for a nice even edge) - 25 stitches. Chain 1 loosely and turn.

Repeat for a total of 41 rows. 

Fold in half, and slip stitch top and bottom row together to make a tube, use tail to weave in and out of edge and cinch tight to close. Turn inside out, stuff with the poly fill and then use other tail to weave in and out of edge, cinch tight to close. Adorn as you wish!

To make tall pumpkin (I shaped into a gourd with the stuffing) - chain 36 and do 41 rows.

To make small pumpkin - chain 16 and do 31 rows.

Monday, October 7, 2019

The Cascade Mountain Beanie Crochet Pattern


Cascade Mountain Beanie Instructions:

Yarn - worsted weight
Hook - 6.5


To begin - chain 4, sl st to first ch to make a loop. Chain 1.

Row 1 - 8 HDC in loop, sl st to first stitch to join to first HDC. Chain 1.

Row 2 - 2 HDC in each stitch around (total 16 HDC), sl st to first stitch to join. Chain 1.

Row 3 - HDC in same stitch, 2 HDC in next, repeat around = 24 HDC, sl st to join and chain 1

Row 4 - HDC in same stitch and next stitch, 2 HDC in next, repeat around =  32 HDC, sl st to join and chain 1

Row 5 - HDC in same stitch and next 2 stitches, 2 HDC in next, repeat around = 40 HDC, sl st to join and chain 1

Row 6 - HDC in same stitch and HDC in next 3 stitches, 2 HDC in next ,repeat around = 48 HDC, sl st to join and chain 1

Row 7 - HDC in same stitch and HDC in next 4 stitches, 2 HDC in next, repeat around = 56 HDC.

DO NOT SL ST TO JOIN. From this row on  you will crochet in the round.

To continue - HDC in the top of the HDC where you would normally sl st to join. Insert stitch marker.

Crochet a HDC in each stitch around until you have 27 rows total. When you complete the 27th row, you will taper off by doing 1 sc, then 2 sl st. Tie off yarn and weave in ends.

This will fit ladies medium (21-22"). You can customize the length of your slouchy by decreasing or increasing the number of rows to suite your taste. 


You may share this post with a link back to mrsbrits.blogspot.ca, you can also do anything you wish with your finished creations. There are thousands of crochet tutorials online, while this is how I make my beanies, if you do find a similar tutorial it is purely coincidental. I ask you do not copy my instructions or pictures or post as your own. 

Saturday, January 16, 2016

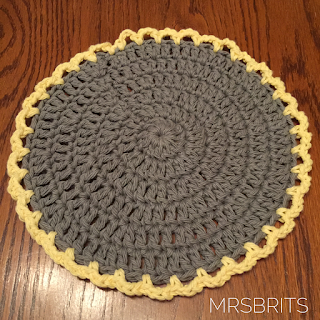
Easy Round Crochet Dishcloth Pattern with Bernat Handicrafter

Turn a yucky chore, like dishes, into a pretty one with these easy round crochet dishcloths.


Materials needed:
Bernat Handicrafter 100% cotton yarn, med weight (4)
5.50 crochet hook
scissors
yarn needle

Pattern:
Row 1 - chain 4 and slip stitch to first chain to form circle, chain 2 and do 12 DC in circle, sl st to top of 1st DC to join (12DC)

Row 2 - chain 2 and 2 DC in same stitch, then 2 DC in each stitch around, sl st to top of 1st DC to join (24DC)

Row 3 - chain 2 and 2 DC in same stitch, 1 DC in next stitch, 2 DC in next, repeat around and sl st to top of 1st DC to join (36DC)

Row 4 - chain 2 and 2 DC in same stitch, DC in next 2 stitches, 2 DC in next, repeat around and sl st to top of 1st DC to join (48DC)

Row 5 - chain 2 and 2 DC in same stitch, DC in next 3 stitches, 2 DC in next, repeat around and sl st to top of 1st DC to join (60DC)

Row 6 - chain 2 and 2 DC in same stitch, DC in next 4 stitches, 2 DC in next, repeat around and sl st to top of 1st DC to join (72DC)

(change color here if you like)

Row 7 - chain 3, skip 1 st and sc into next st, chain 3 skip 1 stitch and sc into next stitch, repeat around until edging is complete.

Fasten off and sew in ends! 

You may share this post with a link back to mrsbrits.blogspot.ca, you can also do anything you wish with your finished creations. There are thousands of crochet tutorials online, while this is how I make my dishcloths, if you do find a duplicate tutorial it is purely coincidental. I ask you do not copy my instructions or pictures and post as your own.

Saturday, October 10, 2015

Quick Crochet Coffee Cozy - Make in less than 15 min!

I've not been well the past few months (not to worry you, all is on the mend) and one thing that helps me mentally is "Craft Therapy". Crocheting is my comfort craft, when I crochet I feel better. So to feel better, I crochet.

I'm enjoying quick gratification when I crochet at the moment and these Coffee Cozies are just the thing. They keep my mind and hands occupied and can be done in under 15 min including sewing in those pesky ends.


Quick Coffee Cozy

Yarn - Worsted weight
Hook - 6mm (H)

Notes:
- the chain 1's do not equal a stitch
- there are lots of youtube tutorials on the reverse single crochet edging, sometimes called crab stitch

Chain 23 and sl to form circle, be sure not to twist.

Row 1: Chain 1, hdc into same stitch as sl st and hdc in each chain around, sl to top of 1st hdc (23)
Row 2 - 3: repeat above (each row will have 23 st)
Row 4: Chain 1, hdc into same stitch and 1 hdc in the next 11 stitches, 2 hdc in next stitch, 1 hdc in each remaining stitch, sl to top of 1st hdc (24 stitches)
Row 5-7: Chain 1, hdc into same stitch and hdc in each st around, sl st to top of 1st hdc (24 stitches)
Row 8 - Chain 1, reverse single crochet in each stitch around (24 times), sl to 1st to the chain 1 and tie off.
Sew in ends and you're done!


You may share this post with a link back to mrsbrits.blogspot.ca, you can also do anything you wish with your finished creations. There are thousands of crochet tutorials online, while this is how I make my cozies, if you do find a duplicate tutorial it is purely coincidental. I ask you do not copy my instructions or pictures and post as your own. 


Wednesday, February 4, 2015

Crochet Slouchy Beanie Tutorial

Here on the Canadian prairies, winters can be long. And by that I mean last year - we had 8 months straight with snow! However long they are, I do love winter, it is pretty and I love the snow. 

EXCEPT - we had a super weird warm January. When the cold temps come back, I will be keep warm and not to mention stylish, with my super easy Crochet Slouchy Beanie.


I use  Red Heart Comfort worsted weight (4) yarn and a 5.5mm hook, and makes a ladies medium-large hat. You can adjust the size smaller by using a 5mm hook or larger by using a 6mm hook.

Here we go!


Row 1: Chain 4 and slip stitch to form circle, chain 1 and do 12 DC in circle, join to top of 1st DC (12dc)


Row 2: Chain 1 and 2 DC in same stitch, 2 DC in each stitch around, slip stitch to join in top of 1st DC (24dc)


Row 3: Chain 1 and 2 DC in same stitch,  DC in next stitch, 2 DC in next, repeat around and slip stitch to join in top of 1st DC (36dc)


Row 4: Chain 1 and 2 DC in same stitch, DC in next 2 stitches, 2 DC in next, repeat around and slip stitch to join in top of 1st DC (48dc)


Row 5: Chain 1 and 2 DC in same stitch, DC in next 3 stitches, 2 DC in next, repeat around and slip stitch to join in top of 1st DC (60dc)


Row 6: Chain 1 and 2 DC in same stitch, DC in next 4 stitches, 2 DC in next, repeat around and slip stitch to join in top of 1st DC (72dc)

Row 7: Chain 1 and 1 DC in same stitch, 1 DC in each stitch around and slip stitch to join in top of 1st DC (72dc)

Row 8-17: Repeat row 7 (72dc)

Row 18-21, do not chain 1, single crochet around in back loop only of next stitch and each stitch around. I don’t join between rows, use a stitch marker and repeat around until you’ve done 5 rows of 72 and fasten off.  


You may share this post with a link back to mrsbrits.blogspot.ca, you can also do anything you wish with your finished creations. There are thousands of crochet tutorials online, while this is how I make my beanies, if you do find a duplicate tutorial it is purely coincidental. I ask you do not copy my instructions or pictures and post as your own.

Thursday, November 20, 2014

Mexican Soup Slow Cooker Recipe

Looking for easy yummy crock soup that is a crowd pleaser? This is it. You can even pass on the pasta if you make and freeze for lunches. 


  • 2 large cans of diced tomatoes
  • 1 can of black beans, rinsed
  • 1 can of kidney beans, rinsed
  • 1 med onion finely chopped
  • 1 litre of chicken stock
  • 1 cup of water
  • 2 packets of low sodium taco seasoning
  • 1 cup macaroni
  • 3 frozen chicken breasts
  • Optional - 1 cup frozen corn
Mix first 7 ingredients in slowcooker and give it a good stir.  Slide in the chicken breasts making sure they are covered by liquid.

In the mean time, cook macaroni to al dente and set aside.*

Cook on high for 5 hours. Remove chicken, chop or shred and add back to pot.

To serve - spoon some macaroni in a bowl, top with soup and stir.  Add a spoon of sour cream and nacho chips to garnish.

* I cook and serve the macaroni separate as it tends to get mushy in left overs. This freezes very well without the macaroni.

Sunday, June 8, 2014

Crochet Market Bag - Fresh off the CharmaCrafts Hook

Long time, no posts. I know! Life, it's been crazy, you know? Never to busy to crochet though, it's my therapy. That and some nice cold iced coffee. 

A couple of months ago, a bestie posted a link on Facebook for a cute crochet market bag. I'd forgotten all about it, and we were texting and I asked her "I need a new crochet project, the afghan I'm working on is getting boring". She said "remember that bag?". Ding! I had a project.


I went to work on the pattern she posted, but it was written for cotton worsted yarn, none of which I had on hand. Off to Pinterest and a quick search later I find this pattern by Bobbles and Baubles written for worsted weight and it didn't specify cotton or acrylic, so I chose to try it with a giant ball of grey I had in my stash.  


It is a super quick and easy pattern to follow. Only took a couple of hours to complete, my only issue was I apparently can't count rows because of my negligent use of a stitch marker. By the time I added a second color I realized I was 2 rows short. I put a 3rd row of color at the top when the pattern only called for 2. The bag is a row short and in the grand scheme of things I don't think anyone will notice. Will they?


For my flower, I used a pattern from a blog called Oodles 4 Noodles, the blog appears to be down at the moment but I managed to save a screen shot of the flower pattern. It makes fluffy flower in the round without having to sew it together after.


I did find the bag a touch on the small side for a market bag, it does make a great wine bag if you are ever in the need to carry 4 bottles of wine anywhere. Who me? So, using the Bobbles and Baubles pattern, I increased the base one more row (to 60 stitches), and this purple bag has a nice finished size of 14" x 14" (maybe 6-8 wine bottles? hehe) and I still did 3 rows of the contrast color at the top vs 2.  I think this size is a bit more versatile!


Wednesday, October 16, 2013

Ribbed Coffee Cozy {Crochet Pattern}

We've established my love for coffee, but coffee is hot, yo! Here's my version of a hand, and earth, friendly coffee cozy.  It's quick and easy, and makes a great gift paired with a coffee card.


Ribbed Coffee Cozy 

Yarn: Cotton worsted (like Bernat Handicrafter) 
Hook: 5mm (H) 

Chain 13 
Row 1 - sc in back loop only, starting on second chain from hook and each stitch across, chain 1 and turn (12 sc)
Row 2 - sc in back loop only, starting on first sc of previous row for 11 st, then sc in both loops of the previous row, chain 1 and turn 
Row 3-30 - repeat row 2 (2 rows make one rib, you will end up with 15 ribs) 

Fold in half, slip stitch the two ends together, tie off and sew in ends. Turn inside out (so seam is on inside). 

You can use other yarn for this, but I find the cotton just works better as the shape stays together. If using an acrylic worsted, you may need to only do 28 rows total as they stretch more. 


You can totally embellish as you like, add buttons, a crocheted heart, even alternate colors!


You may share this pattern with a link back to mrsbrits.blogspot.ca, you can also do anything you wish with your finished creations. There are thousands of crochet patterns online, while I did create this one on my own, if you do find a similar pattern it is purely coincidental. I ask you do not copy my instructions, or pictures, or post as your own.

Saturday, August 24, 2013

Sweet and Chunky Baby Afghan {Crochet Pattern}


I had the pleasure of making this for my friend Corrina's newest addition, Miss Alana.  If you're looking for an easy crochet baby afghan pattern that works up quick, and turns out lush and soft, then this is the pattern for you.

I used Bernat Baby Blanket yarn in "Pitter Patter", it is a super bulky yarn. I used a 9mm hook so the stitches were nice and plump without being too tight. The finished size works out to be 30" wide x 36" tall, however you can easily adjust this to your preferred size.


Sweet and Chunky Baby Afghan Crochet Pattern

Hook - 9mm
Yarn - Bernat Baby Blanket, this size took 1 and a half of the 300g balls

To begin - chain 61

Row 1 - sc in 2nd chain from hook and in each chain across, you will have 60 sc.  Ch 1 and turn.

Row 2-6 - repeat row 1. At the end of row 6, you will chain 2 and turn.

Row 7 - dc in first sc from row 6 and in each sc across. Chain 1 and turn. Be sure you still have 60 st, because this wool is thick, it can be tricky on the last st of the row.

Repeat rows 1-7 6 more times for a total of 49 rows.  You will have 7 sections of 6 rows of sc and 1 row of dc.

Rows 50-56 - repeat row 1. At the end of row 56 do not chain 1, do an additional 2 sc in the last st to create a corner. You will now begin edging the afghan.  Do a sc in each sc row, with 2 sc in the post of the dc rows, in each corner you will do 3 sc. Once you finish the 3 remaining sides, tie off and weave in your tails.

Tips 
- when starting the new ball, I dont tie off the old and then start the new. I just tie the end of the new ball to the end of the old and keep going, crocheting in the knot. When Im finished, I weave in the ends.
- to make this bigger / longer, you can do your beginning chain row as long as you like in an odd number. For length, just repeat rows 1-7 as you like, ending on a section of rows 1-6 + 1 row of sc (this is the edging for the top of the afghan).

I'd love your feedback on the pattern! If you find anything odd, or any corrections, please let me know so I can update the instructions.


You may share this pattern with a link back to mrsbrits.blogspot.ca, you can also do anything you wish with your finished creations. There are thousands of crochet patterns online, while I did create this one on my own, if you do find a duplicate pattern it is purely coincidental. I ask you do not copy my instructions, or pictures, and post as your own.

Tuesday, July 30, 2013

Cucumbers & Onions {Recipe}

A favorite holiday side dish in our family, since I was a little girl, was cucumbers and onions. Now, for family get togethers, these are my job. They are awesome all year round and perfect for a summer side. 


For 1 jar of Cucumbers & Onions:
  • 1/2 c white vinegar
  • 1/2 c water
  • 2 tbsp sugar
  • 1/2 tsp salt
  • 1/2 tsp ground black pepper
  • 1/2 tsp celery salt
  • 1 medium field cucumber, sliced
  • 1/3 white onion sliced (I cut into c's)
Mix the first 6 ingredients in a large mason jar and give it a good shake, then stuff the jars to the top with cucumbers and onions. Refrigerate for 5-6 hours minimum (best is overnight), drain and serve. I can't say how long these last in the fridge, mine are all eaten within a few days if not the day I make them if it is for a holiday meal.

Pin It

Tuesday, May 28, 2013

How Not to Cool a Pie

A friend I met through Twitter, Leanne Shirtliffe, had a twitter party last week for her new book Don't Lick The Minivan.  I'd never fully participated in a twitter party before, so thought this would be a super fun one to jump in on. And I wasnt wrong, there were plenty of funny stories and laughs had by all.  One of her questions was "share a cooking fail".  And did I have a fail to share.  Of epic proportions.

I was a teenager, probably 16-17, and decided to make my very first pie. It was going to be a lemon meringue pie.  Id spent a few hours on it, made it all from scratch.  And it was perfect.  And the meringue didn't shrink.  Did I mention it was perfect?  My parents were quite proud, as was I, we could not wait to stuff it, I mean taste it.

I'm sure it was spring time because it was cool and dry out,so I thought why not put the pie out on the front step to cool off?  I could do some laundry in the mean time, and pie would be ready to dive into by the time my jeans were dry.

Out goes the pie on the step, in go my jeans in the dryer.  Ideally, this was a great idea.  Logistically, it was not.  I happened to place the pie directly under the dryer vent. 

When I went out to get my pie, I cried. There it was, all covered in lint.  I had linty pie.  All that hard work, and it was covered in blue lint.  Not only that, it was all melted too.  Smooshy and runny and I was so very, very sad. 

I was not about to give up on it, we put it in the fridge hoping it would firm up (which it didn't).  We scrapped off some of the lint, scooped it into bowls and tried to eat it.  Know what's worse than linty pie? Linty, Bounce flavoured, pie.  And this is why I don't make pie.

You also need to go check out Leanne's book ASAP.  First chapter had me snort laughing, complete with snot bubbles and belly laughs that woke up my husband last night when I was reading in bed.